How to use Git with SSH keys on Linux
Learn to work with repositories on GitHub, GitLab, and BitBucket using login via SSH keys.


If you have two-factor authentication (2FA) enabled on your GitHub/GitLab/BitBucket account (which you must, and if you don’t then go and enable it right now), you can no longer push code to your repositories using the regular login via username and password; therefore you have two options: either generating a token and using it as password, or accessing via SSH key.
This latter method is my preferred one and the most secure. It involves creating a pair of private and public SSH keys; the private one stays on our computer while the public one is loaded to the website, and with them client and server can establish a connection with each other. I’m now going to explain how to do this on the 3 aforementioned Git providers.
This tutorial is essentially a summarized version of Linux Kamarada’s terrific post on the topic, but I’m going to be more straightforward and make a few useful changes to the method.
Table of contents
- Installing the SSH client
- Generating the SSH keys
- Adding the public key to our account
- Loading the private key to memory
- Cloning/pushing
Installing the SSH client
We’ll start by installing the SSH client via the official repositories of our distro. Depending on the distro we use it may already come preinstalled, but if not, we can use any of these commands:
Debian/Ubuntu:
1
# apt install openssh
Arch Linux:
1
# pacman -S openssh
OpenSUSE:
1
# zipper in openssh
Generating the SSH keys
Now we create a new pair of SSH keys with the following command:
1
$ ssh-keygen -t rsa -b 4096 -C "[email protected]" -f ~/.ssh/github
Replace [email protected] with the email you use for your account, and github with the name you want to give to the keys; for example, ~/.ssh/bitbucket.
It’ll ask for a passphrase, which is optional but recommended, and at the end it’ll spit out a pair of private and public keys to the given location (~/.ssh).
The private key has no file extension and it should be secret and remain on our computer, while the public one ends in .pub and it’s the one we’ll add to the website.
Adding the public key to our account
With the public key generated we’ll proceed to add it to our account. For this purpose, follow any of the links below:
- GitHub: https://github.com/settings/keys
- GitLab: https://gitlab.com/profile/keys
- BitBucket: https://bitbucket.org/account/settings/ssh-keys/
You’ll see the option there to add an SSH key, as well as giving it a title/label to identify it (of your own choice, it can be “My laptop” or whatever).
Then open the public key (the .pub file) with a text editor, copy its contents and paste them in the designated field, then save the changes, and the key will be added.
Loading the private key to memory
In order to log in we’ll load the private key to the ssh-agent. This is a tool that will save it in RAM, so that we can use the key without typing the passphrase each time we connect to our repositories. For this, simply type the following commands:
1
2
eval "$(ssh-agent -s)"
ssh-add ~/.ssh/github
As usual, replacing github with your generated private key if you’re not using that name. With this, the key has been loaded to memory and is ready to be used.
Now type any of these commands to test the connection:
- GitHub:
ssh -T [email protected] - GitLab:
ssh -T [email protected] - BitBucket:
ssh -T [email protected]
If everything went well, we should see a message asking whether we want to trust the server, to which we reply “yes”, and the connection will be established.
Pro tip
ssh-agent works in RAM, therefore the session will be closed as soon as we close the terminal. To log in easily without having to type those commands continuously, we can make a small script that does it for us. We simply open our ~/.bashrc file and paste this at the bottom:
1
2
3
4
githubkey () {
    eval "$(ssh-agent -s)"
    ssh-add ~/.ssh/github
}
You can rename the script as you wish, for example, gitlabkey or bitbucketkey. Replace also the name of your private key. Then save the changes and apply them:
1
$ . .bashrc
Now whenever we want to start the ssh-agent and load the private key to it, we only need to type:
1
$ githubkey
Cloning/pushing
Using Git via SSH means we can no longer clone/push using the regular URLs for our repositories. These URLs connect via HTTPS and we need SSH addresses. The SSH address of a repository is available in the “Code” menu of GitHub (only visible when logged in) and GitLab, and “Clone” on BitBucket. Example:
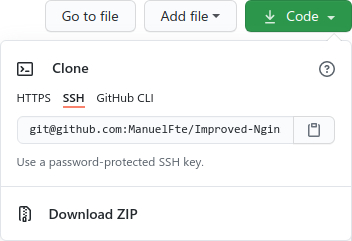
The URL has this structure:
1
[email protected]:Username/Repository.git
We can use this URL to work with the repository in the usual fashion; for example, to clone:
1
$ git clone [email protected]:Username/Repository.git
In order to work with our existing local respositories, we have to update them. We just open the .git/config file of our local copy with a text editor and change the url value. Alternatively, this can also be done via console:
1
$ git remote set-url origin [email protected]:Username/Repository.git
And this is all, we’re now using Git via SSH.


