How to make a blog with Jekyll + Nginx + Ubuntu 20.04
Tutorial to self-host a Jekyll blog on your own server.

Introduction
As explained in my return post, years ago this blog used to be hosted on WordPress, a platform that I still use for professional purposes and that I continue to consider the best CMS for collaborative blogs and commercial websites. However, over time I’ve been increasingly dissatisfied with it when it comes to minor projects like personal blogs, that don’t require of all the power WordPress provides and where this only means an overhead.
When I decided to revive my blog, I opted to use a different platform; something simpler and that didn’t demand that much configuration and maintenance. After evaluating some options, my choice was Jekyll. This is a blog generator that, in contrast to most CMS, is not meant to be installed on the server, but on the PC. Jekyll reads the configuration files and posts (which the user writes as Markdown files) and converts them to plain HTML, CSS, and JS files, which the user now uploads to some server on the Internet to create a static website.
Moving the processing part out of the server and into the client has very important advantages, including:
- Higher speed and performance, due to the server not doing any kind of processing and merely serving plain files.
- It can be hosted on any service that allows to upload and display HTML files. No need for PHP or other programming language running on the server.
- Increased security, as there’s no sort of user accounts or admin panel to hack.
- No need for databases, with the complications and security issues they carry.
- Zero maintenance, as you don’t have to worry about keeping the blog’s files up-to-date (though you should still keep the server itself up-to-date if you’re the one managing it).
Jekyll is better known as the engine behind GitHub Pages and is usually used in combination with it; however, I didn’t want to depend on GitHub for this and I’d rather self-host it on my own server in order to have absolute control over my blog.
In this tutorial I will explain how I did it, using a VPS running an Nginx server over Ubuntu 20.04 LTS.
Table of contents
- Prerequisites
- Installing Jekyll
- Creating the blog
- Configuring the server
- Uploading and updating the blog
Prerequisites
This tutorial assumes that you already own a VPS where to deploy the blog, on a service like DigitalOcean, along with SSH access and a domain pointing to it. If you don’t have any of this, I leave a couple of links below with guides on how to do it, using Ubuntu as the server’s OS, compatible with the present tutorial:
For buying domains I recommend either Name.com or Namecheap (click either of them to see how to point them to your VPS).
Installing Jekyll
Jekyll is written in Ruby and distributed as a gem, so we’ll start by installing this programming language on our PC. You can consult Ruby’s documentation for instructions for your system. In my case, since I’m using Manjaro, I simply do this to install it along with Rubygems:
1
# pacman -S ruby rubygems
Update 2021/12/27: A few months after posting this article, Ruby v3 was released, and almost a year later Jekyll still hasn’t been updated to support it and still requires Ruby v2.7 to work. This will cause compilation errors and will make impossible to generate the blog. I’ve posted a temporary solution for Arch Linux/Manjaro users on my blog of tips explaining how to install Ruby 2.7 without having to downgrade, so in the meantime ignore the above command and follow those instructions instead; then at the end run solely # pacman -S rubygems. Continue with the rest of the original instructions as follows.
Before installing any gem, we have to configure RubyGems to install gems on our home folder, or else we’ll encounter a few issues. Fortunately this is simple. We start by opening our .bashrc file:
1
$ nano ~/.bashrc
And pasting this to the bottom:
1
2
3
# Install Ruby Gems to ~/.gems
export GEM_HOME="$HOME/.gems"
export PATH="$HOME/.gems/bin:$PATH"
We apply the changes (pay attention to the initial dot):
1
$ . ~/.bashrc
Now we create a new file called .gemrc on our home:
1
$ nano ~/.gemrc
And paste this:
1
2
gem: --no-user-install
install: --no-user-install
The configuration is complete. We can proceed to update the gems:
1
$ gem update
And install Jekyll and Bundler:
1
$ gem install jekyll bundler
Jekyll is now installed and ready to work with.
Creating the blog
To create the blog, we run this on our PC:
1
$ jekyll new example.com
This will create a new folder called example.com (you can name it however you want) with the core files inside it, which will look like this:
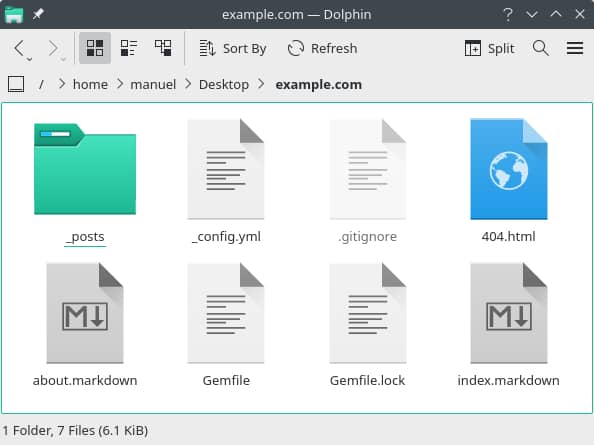
For the moment we’ll skip in-depth customizations and we’ll focus on the relevant part, which is the _config.yml file, that stores the basic settings of the blog. Simply open it with a text editor and fill the blog’s information as per the comments included in the same file.
As it can be deduced, the posts are stored in _posts, and there are already a few default ones there that can be edited and used as reference to write your actual blog posts, following the same pattern.
After the blog is configured, there are two main commands we can use to run the software. We won’t use them both, but will use one or the other depending on what we want to do.
In order to make Jekyll process the files and export them to plain HTML, we navigate to the blog’s folder on a terminal and do:
1
$ bundle exec jekyll build
This will create a subfolder called _site inside the blog’s folder, with the generated static website, ready to be uploaded to the server.
Alternatively, we can use this other command:
1
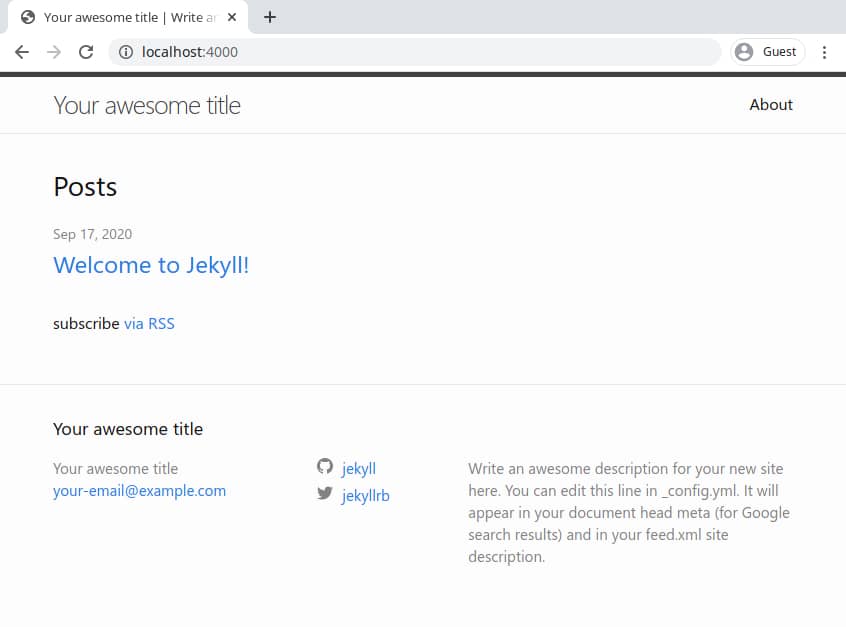
$ bundle exec jekyll serve
This does the same as the former, except that this one also launches a local server which allows you to see your blog live on the browser, by going to http://localhost:4000. The default theme (called Minima) looks like this:
We now just need to take the contents of _site and upload them to some server.
Note: At any moment you can press CTRL + C to stop the local server.
Configuring the server
It’s time to set up the server that will host our blog. My favorite alternative is Nginx, and the simplest method to install it on Ubuntu would be to access the VPS via SSH and type this:
1
# apt update && apt install nginx
After it’s installed, you can use my Nginx configuration files for a setup that has been tested on Jekyll. Just follow the instructions in the README and your server will be ready to go (skip the part about uploading the files as we’ll do that in the next step).
As pro tips, I recommend setting up a firewall as well, and getting an SSL certificate either with Let’s Encrypt or Cloudflare.
Uploading and updating the blog
At this stage we only need to upload our blog to the server, by taking the contents of _site and placing them inside /var/www/example.com/html. We could do this via FTP, though it’d be impractical, as we need to reupload the files every time we change something or write a new post, and with FTP this would be tedious and bothersome. The ideal thing would be to do it via the command line, by typing a simple command that does it for us, similar to doing a git push.
For this goal I borrowed the idea by Scott Johnson from FuzzyBlog, who wrote a Bash script that uses rsync to synchronize the local blog’s copy with the one on the VPS; though I adapted it for the configuration used in this tutorial.
To use this script, open your .bashrc file again:
1
$ nano ~/.bashrc
And paste this at the bottom:
As you can see, this function first builds the blog using bundle exec jekyll build, and then uses rsync to log into the VPS and copy the contents of _site into /var/www/example.com/html. Edit it putting your information in the variables and then apply the changes:
1
$ . ~/.bashrc
The final step will be to open a terminal and type:
1
$ updateblog
The blog should now have been uploaded, and we can use this same command whenever we want to update it.
Now you can enter your domain on the browser and see your brand new blog live.
Pro tip: I also highly recommend that you install the Jekyll Admin plugin to have a sort of classic dashboard from where to write and manage posts more easily.


